Monday 24 November 2014

Finishes

I have a couple of recent finishes. While I'm sorting through the many photos of the one I can share, here's a peek at the one I can't share in full yet while I was quilting it:


You can see I was using some of the fabrics usually used in my beach scene quilts in a very different design.

Wednesday 5 November 2014

Cutting and piecing the sky

This afternoon I pieced the sun and the sky of my current beach scene. It's all done as a single foundation-pieced section, with the sun pieced first, then the large sections of sky added afterwards. I drew out the sun on an A3 piece of paper and photocopied it before taping it in place to my full size pattern. I cut up the photocopy to use as templates for cutting the fabrics - I just have to remember to add the seam allowance as I go. But I have a different, no-waste method for the cutting the large pieces of sky.

Once I've selected my sky fabrics, I start by lying my marked sky foundation over the first sky fabric, so that there is enough for a generous 3/8 - 1/2in seam allowance all around, but otherwise at the edge of my fabric to minimise waste. I'll place a few pins inside the shape I'm going to cut, but nowhere else.

If there are curved edges to cut, I use an air-erasable fabric marker, and mark right on the lines - you need to go back and forth a few times to make the ink go through, but it's not hard. I just mark a dotted line:


It shows well enough, especially on pale sky fabrics, and will fade on its own:


Then I fold back the foundation and use scissors or a small rotary cutter to cut a generous seam allowance.

For the straight seams, I place my long ruler between the foundation and the sky fabric, again, leaving a generous seam allowance outside the marked sewing line. And again, I gently.fold back the foundation, and use a rotary cutter along the ruler:


And it's done:


When I sew it, it actually goes on top of the foundation, but I forgot to take a photo of the completed sky.

Thursday 30 October 2014

My view of the beach

My preferred view of the beach is at my sewing table, creating my own beach made of fabric. Here are a few quick views in different directions yesterday while I was putting the water section together. I started in the afternoon.

Right in front of me is the section I was working on adding pieces to:


Behind that is piles of water prints (I'd just finished with the reef sections):


Above those, taped to the window, is my pattern, with sections in progress pinned to it:


To my left is a mountain of aforementioned reef and fish prints where I tossed them, awaiting refolding:


On the floor at my right are discarded trimmings, which I gathered and binned when I stopped at about 4am:


Back up on the window, this is how it looked at 4am with the sections all pieced, but not yet joined to each other:


And this is Eleanor at the beach last weekend:


Friday 24 October 2014

Musings on quilting classes

Some things I might not usually say, randomly interspersed with overdue photos from our skiing holiday:

 (Eleanor and I)

I can only go by my experience at the classes I attended and the few I walked by, but there's something I found a little frustrating at the Australian Machine Quilting Festival, and it was nothing to do with the organisation.

(Where I skied at 115.1kph)

It's this. While it was wonderful to see the huge numbers attending classes by some of teachers who are currently the it-names in social media, it was really disappointing that there weren't so often the same numbers in the classes of some of the really experienced teachers. Because, frankly, I felt that's where the real value of AMQF was.

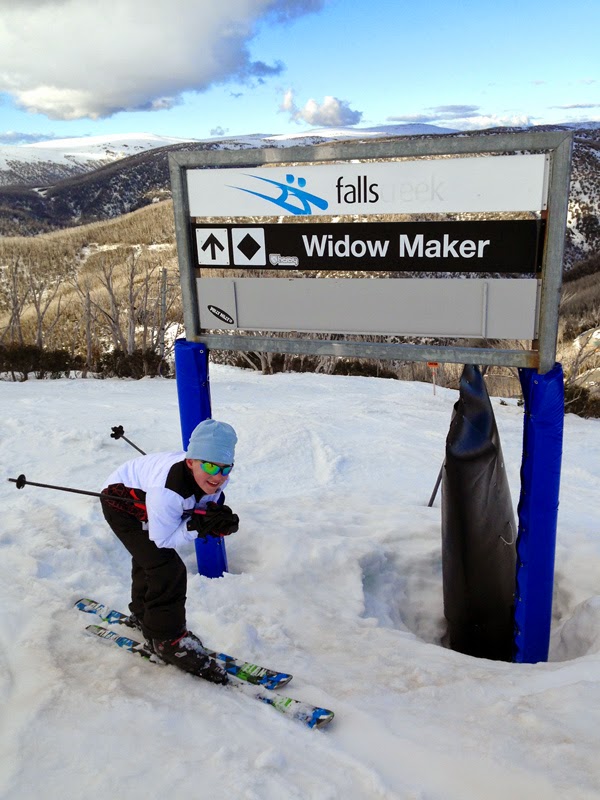
(Me in James' sunnies)

Don't get me wrong, all the teachers were good, but some were simply brilliant. There's art in quilting and there's an art to teaching.

(While I'm on it; we quilters are generally a nice bunch, so for anyone teaching - don't just ask for positive feedback! Constructive criticism can be incredibly beneficial, especially at an event such as AMQF where students are exposed to multiple teachers over a short space of time and are likely to be well-placed to explain how a class might be improved.)


(Eleanor)


Maybe it was unnecessary on my part, but I felt bad for them that the student numbers weren't there. And sorry for the students that didn't know what (and who) they were missing out on.

Every 2 years when AMQF comes around, there are usually a few specific international instructors who I've been wanting to take classes with who come out, and they're always at the top of my list; I tend to be fairly selective with my classes, but I do have a good look through all the offerings.

(James)

All the teachers get excellent and comprehensive writeups on the Festival website and are well promoted on the AMQF blog. And I admit I'm likely to stick to those I'm already keen to learn from. But over the years I have built up a pretty broad awareness of teachers in the quilting industry, and usually I know at least a bit about all of them.

(Simon & Eleanor)

I don't know what the solution is. Except next time, I'm going to be singing some praises in advance - after I've registered for all the classes I want, just to be safe!


In summary - fabulous festival and fabulous skiing and I can't wait until next time for either!

Thursday 23 October 2014

Fabric wave

There's an imminent new arrival in our extended family, so it's time for me to get working on another version of my baby beach scenes. Simon suggested I incorporate surfing since the father is a keen surfer. That was the starting point for my designing, anyway.


I ended up with this row of (potentially surfable?!) waves which will go across the top of the reef/water section, and I started by piecing them.


I divided the waves into organic shapes, much like those I used in the much larger Australian scene and space quilts, which I could then piece from different colour water fabrics. The first step was to trace these onto mid-weight non-woven interfacing and mark some registration points along the curved seams to help piece thems evenly, then cut the pieces apart.


After carefully selecting the fabrics to use for each piece (colour, and a smooth gradation was the main consideration)I placed the interfacing patter piece directly on the fabric and drew around it with a air-erasable marker, adding the 1/4in seam allowance by eye as I went. I then added the registration marks and the piece number with a fine-tip permanent pen before cutting it out. I've saved all the interfacing pieces in case I want to do the waves again.


Then I pinned all the pieces in place on my pattern and checked I was happy with my fabric choices.


Then it was just a case of gradually sewing them all together, carefully easing the curves.


The wave section is all done now and will be pieced to the top of the reef/water section once that's done (the bottom is straight-ish).

Sunday 19 October 2014

Possum mini-pattern

I recently had a request for my possum pattern and agreed to sell it with the purchased Winter Harvest/Seasonal Tree pattern. By the time I'd prepared it to a standard I was happy with, I realised I'd created a mini pattern! So I've decided to add it to my Etsy shop as a pattern sheet.

It's designed to be a companion piece to the tree pattern, but can be purchased separately.


Here are a few things to know about it:
  • It's a single A3 (roughly ledger size) page
  • Postage is free with any other item
  • It has the possum layout and pieces
  • It tells you what fabrics to use and what order to place the pieces
  • It tells you how to add the details to make it look like a cute possum
  • It even explains that it's an Australian possum and not an opossum!
  • BUT it does NOT cover standard fused applique procedure (that's covered in the tree pattern).
  • If you want to put the possum in the tree, you'll probably want to enlarge the tree by around 125% or more (and it's ok to have an enlargement photocopied for personal use).

Saturday 18 October 2014

Change

After more than seven years, I've finally made a few changes to the look of Sampaguita Quilts. In all that time, I've only tinkered around the edges, and the look of the blog has remained quite consistent. I don't like change, and I really did like the way it was, so it was a long time coming - and I've actually kept it pretty minimal although the changes are quite obvious.

Over the years I've had a few sporadic comments from people who found the pale text on black background difficult to read, but what really spurred me on (yes - several months ago!) was a few more of them when I was unfortunately forced into pushing you into coming here to read instead of being able to read all the content in a reader after I had content stolen. I didn't ignore those comments; I was coming to grips with the necessity, and sporadically finding time to look at the options and test out new headers etc...

In the end, I've kept the colour scheme but changed the colours around - and really haven't changed much else. I don't love the new look, but I can live with it. I plan to rotate the header on a semi regular basis - but then again, the current one fits nicely with the colour scheme, so maybe it'll stay!

In the meantime, I'm happy to take feedback - is it easier to read? I can't promise quick action though!


(I recently took some styled photos of a few of my quilts, deliberately showing plenty of the backings,
to potentially go in the next Kennard & Kennard backing fabric catalogue)

Wednesday 15 October 2014

My list

I have quite a list of quilty tasks to get done before the end of the year. So, inspired by my friend Andrea's blog post, I thought I'd share it. We have a bit of a habit of not-too-subtly reminding each other to keep on track when our motivation is running low, and sharing lots of fun chitchat and secret progress photos along the way. Just the sort of friend I need!

I've divided my list into two - essential and hopeful. They're roughly in order of deadline/priority and include a few quilting jobs. There's also plenty already on the early-2015 list as you can see...

Essential
Finish some quilt instructions
Beach scene baby quilt for imminent niece/nephew (unstarted)
Watery magazine quilt (started)
Quilting for Andrea (custom)
Up to 3 more quilting jobs
Help James quilt and finish his current quilt

Hopeful
Single bed quilt for nephew (partially designed)
Single bed quilt for another nephew (also partially designed)


Early 2015
Two magazine quilts
Commissioned quilt (in the design stages, will be big)
Baby quilt
Eleanor's bed quilt (I promise!)

There are also quite a few other 'one day' quilts  on another list somewhere, and I can't shake the feeling that I'm missing one or two from the lists above, too...


(The runner is all finished)

Monday 13 October 2014

Using what I learned

The red and white table runner is quite angular in design and not really suited to my usual quilting designs, so I took some of what I learned at AMQF and did something different, although I rather mashed together things from different classes and a bit of my own technique.


I didn't buy much while I  was there, but after seeing Jamie Wallen use these nested diamonds to such effect I bought several shape sets (and am kicking myself for not buying the two circle sets while I was at it!). You can see a few of the smaller ones in the background of the photo below. I started by randomly marking scattered diamonds around the background of the quilt.


Then I quilted along the marked lines and filled in some of the spaces, always leaving the outermost diamond border unquilted, but otherwise with plenty of variety. Some of them have just a big space in the centre with one fill, others are a bunch of concentric diamonds with every other row filled. And almost every fill is different.


It's all done freehand for a few reasons. First, I don't have a ruler foot (once I can get one for my machine - it's apparently in the works form a few directions) I will, and I know what ruler I want, too). Second, I couldn't be bothered chopping and changing feet - or being forced to turn the quilt all the time! And third, by the time the fill is quilted all around every line, you'd never know whether they were quilted perfectly straight or not. (Shh - don't tell anyone!) Plus, I'm reasonably confident in my ability to follow short, straight lines - and it's just good practice anyway.

Red and white

This weekend I've been working on another new quilt.


It's just a small one this time; a table runner for Australian Patchwork & Quilting. I had all the foundations ready to go and all the fabrics cut, including the border and binding.


Because of the white background, it was important to trim the dog-ears from the red pieces so they wouldn't show through the front of the quilt when it's done, so I had a pretty pile of  scraps on the table. Normally I chain-piece and don't end up with so many thread-ends, but to start with the seams on my foundations were only in the centre, so I had to pull each piece well through the back of  the machine before putting the next one in, leaving me with this big pile.


I had plenty of uninterrupted sewing time because Saturday was the start of the sailing season. A a couple of weeks ago Simon bought a third boat (this one for Eleanor), so the three of them were down at the sailing club for opening day all day. It needed a bit of superficial repair work first (above).


The blocks came together really nicely - until I realised I'd used the wrong colour in for one piece in two of them. It's a real pain going back and replacing pieces in foundation-pieced blocks after the fact. It can (usually) be done - and I did it - and I'm glad I did, but there were four-letter words said! I'll be extra-careful when I check the instructions now. The fun part comes next - quilting it.

Saturday 11 October 2014

Icy

My latest applique quilt, Icy, is is the new issue of Australian Patchwork & Quilting magazine (Volume 24 Number 3) which should be available in stores locally any day now.


It's the Christmas issue, but I chose to use my special snowflake fabrics (even the background fabric is a white-on-white snowflake print!) because I love the colours and of course the imagery, even though it's hardly representative of an Australian Christmas!


All the applique pieces are shaped like feather plumes, and were appliqued at the same time as the quilting; shown in the photo below:


I use Lite Steam-a-Seam2 for all my fused applique. It gives the best hold without adding stiffness and prevents fraying effectively, plus I love the temporary hold you can get from the heat of finger-pressing the pieces in place. It's finally back in production and hopefully back on the shelves after almost a year - read the story here. Fortunately I had (have) a large roll on hand!


Some of the smaller plumes ended up with little snowflakes positioned really nicely at the tips! The aqua plumes are only about 1.5" long.


The texture is lovely; I could spend ages running my fingertips over this quilt!


All the applique is done first in matching threads, then I filled the background in white McTavishing. My McTavishing style is constantly evolving. This time I experimented with breaking up the larger expanses with some longer, curvier swirls and used more echoed Cs to fill in spaces that I have previously.


Oops! I've just noticed a tiny unquilted gap in the photo above - can you spot it? It only needs a single line adding; I'll do it next time I'm quilting.

I've also realised that plume applique shapes placed in some sort of circular formation is becoming a bit of a habit recently, for example:

(Louise)


(Splash!)

Hmm. There are a few more plume appliques on another upcoming quilt, too! As much as I love them, it's time for a change, I think!

Wednesday 8 October 2014

This little piggy

It's school holidays and last week over just a couple of days, Eleanor and I quilted her first quilt. First we went through the process of pulling out about a dozen threads of various types in coordinating colours and I guided her through auditioning them and narrowing down the options until we found her favourite.

I started by making her draw out the meander on paper a few times, which really didn't impress her, but it's just so important to get an idea in our head and muscles of what we're going to quilt. Jamie Wallen reminded us of this in his class at AMQF and I took special note to tell her!


It's quilted in a simple meander spaced at about 1in, and we finished it in 6-7 sessions of 10-15 minutes each. As I do with James, I stand Eleanor on a child's wooden chair in front of me at my machine, and she rests her hands lightly over mine as we quilt. By the end she got quite good at understanding where we'd need to go next to fill in the spaces.

She's been at me ever since to finish it off, so tonight I had a view of these and plenty of other pigs (she chose quite a selection of pig prints for her backing!) while I hand sewed the binding down.

Eleanor has already chosen several fabrics for her next quilt, which she insists will be for me!

Sunday 5 October 2014

Gathering thoughts

I'm still gathering my thoughts for a summary post on my classes at AMQF, but I have to say Jamie Wallen was my unquestionable highlight. I did a Thread Fusion class with him yesterday morning and was blown away. I learned so much, and had so much fun! WA girls, he's heading Perth this weekend, and I advise you to drop everything and get into his class(es) any way you can!


 (Magpie lark on the footbridge)


At the end of the day, this time with camera in hand, I decided to wander over the new footbridge towards Adelaide Oval and act like a tourist for a while.


(Festival Centre behind the waterfeature off the side of the new footbridge)

Today I'm piecing though. I've a stack of water prints out, but I'm not working on a beach scene. Instead, so far I've created three of these gradations from dark to light, to which I'm going to add some appliqued sections.


This quilt is headed for Australian Homespun next year, so there will only be peeks until then.

Friday 3 October 2014

Lucky to be in Adelaide

This time every two years I say how lucky I am that the Australian Machine Quilting Festival is held right here in Adelaide. It brings fabulous national and international quilting teachers to my doorstep! The 3rd festival opened on Wednesday and today (Thursday) I took the day off work and went to a couple of classes - I have more in the next 2 days.

In the morning I went to a lecture/demo by the talented Judi Madsen from Green Fairy Quilts on the use of straight rulers. I'm definitely going to have to rig myself a foot that will work with rulers on my 820 (I've seen a few hacks) and get a quilting ruler and try it out. I really wish Bernina would make a free-motion foot for use with rulers. There was an opportunity to take photos of a few samples after the class, but it was very crowded, and silly me forgot my proper camera, so I just looked.


After lunch I had a break and enjoyed some quiet time reading by the Torrens. It really was lovely, with families out enjoying the parks in the holidays, the new footbridge in use and reflecting the sparkling water, Popeye and the paddle boats going past, and this local below who sat with me for about 5 minutes, before nearly clipping me with its wings as it flew off:


In the afternoon I went to a lecture/demo by Linda Taylor called Feathered Dreams. I was especially delighted to see Linda on the list of teachers, having discovered her back here, when I quilted this feathered quilt for a friend. Unfortunately scheduling clashes meant I could only fit in one of her classes, but I'm so glad I went; she's a brilliant teacher! Even with only my iphone, I couldn't help take a photo of this beauty she'd brought in, but how I wish I had my good camera to take a better photo of it!

(detail of quilt by Linda V Taylor)

I think I will have feathered dreams tonight! And tomorrow I will take my camera!