Saturday 31 May 2014

Plate feathers tutorial

The feathered border is finished, now here's a bit of a tutorial on how I did the feathers. This method will work for borders from around 8in wide, up to 12in. I used it previously on two borders combined.

You'll need a circular template which is about half the width of the border, perhaps a little more, and an erasable marker. I use a Sewline air-erasable marker, as it goes on really easily, is nice and visible, and I trust it to come out. For round templates, I search through my crockery cupboards for a bowl or plate which is the right size!

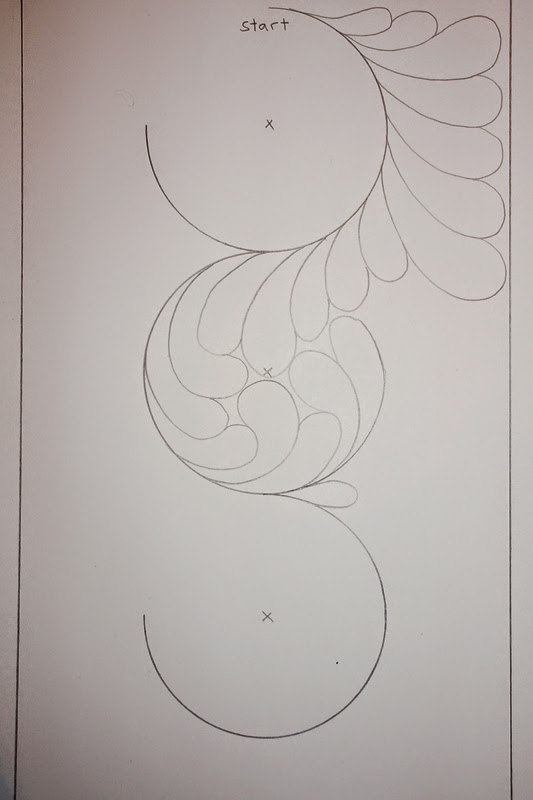
Then it's just a case of tracing 3/4 around the template. It's a bit hard to see in the photo of the fabric above, so I moved to a pencil and paper diagram:

Start at the end of the quilting area, shown at the top. The 3/4 circles always start in the middle of the border, and alternate directions. I like to place a small cross at roughly the centre of each circle. This helps me judge better when filling the circle with feathers. There's no need to quilt the spines first.

Start quilting where you started drawing. Quilt feather plumes around the outside of the first circle, and follow along the spine as it turns into the inside of the second circle. Fill the circle.

Backtrack along the spine to where the second circle meets the third, and quilt a teardrop shape between them.

Then work back up from the teardrop. This step plus the teardrop above form part A of the repeating pattern once you get going.

Bactrack along the spine again, this time all the way to where the first circle meets the second, and quilt another teardrop shape between them.

Then work up from the teardrop, feathering up to the starting edge.


Backtrack to the teardrop and quilt feathers around the outside of the second circle and into the third circle. Combined with the teardrop, this forms part B of the repeating pattern.

At this point I went back to the earliest point which needed feathers adding, so I could mark some more circles without having to move my quilt from the machine. Because I use the air-erasable pen, I can only mark 3-5 circles at a time, so they don't vanish before I get to them!

Continue along the borders, alternating A and B.

When you get to a corner, be sure to place the corner 3/4 circle centrally in the corner.

You may find that the circle doesn't fit neatly into the length of the border. The simplest way to check is to measure across the circle (its diameter). Add 1/8in to this to allow for a gap when you trace. Then mark this interval all along the very edge of the border. If you get to the end and it perfectly meets the centred corner circle, then all's well. If there's a gap or overlap, the easiest thing is to squash or stretch each circle (or just a few if needed) a little bit as you trace. My bowl was 5in across, so I marked out 5 1/8in increments along the edge of the quilt, right at the very edge of the fabric. In a few places I stretched my 'circle' out by as much as 1/4in, and it's not noticeable. Another option is to allow a gap between the circles at the corners and to draw in a smooth connecting line. Does that make any sense at all?


EDIT - A couple of people have asked when to fill the first circle. You're right, I obviously got out of kilter! I've been locked out of my blog for ages and couldn't answer, and have forgotten exactly, but probably drew it in when I did the first teardrop - but I'd recommend you do it at the very beginning.


Friday 30 May 2014

Feathered border

I've started quilting this cute Paris-themed quilt. The borders have a little fullness, so I decided to quilt them first, rather than compound the issue by quilting the centre first.


I used very angled lighting and no flash to show it on the busy print above, but it shows much better from the back, below.


In some ways it seems overkill on the print, but I really like it. It's also fairly quick and easy fro feathers, as I have a simple way of doing the spines, which I'll explain tomorrow. It's a method I've used before and loved - and been wanting to do again. I'll likely get it out of my system on this huge border! The border is about 9in wide, and the quilted section shown is about 15in long. I've since quilted about 35in, but am little more than 10% of the way around.

Thursday 29 May 2014

Cabling

I got distracted from the quilting I wanted to do tonight by my knitting. From about Easter I start feeling the urge to knit, and am getting more adventurous. Below is my first go at knitting cables, and I love it! I'm following a pattern - except I've adapetd the size.


I'm also about to start a jumper for James. I found a pattern which is close to what I want, and have done a small test knit to change the cable. I'm also going to knit it in stripes, while the original pattern uses a variegated yarn. Even in knitting where I'm quite inexperienced, I know just what I want, and will change it to make it my own!


Lastly, I started a bolero for Eleanor a while back. But I'm using different yarn, and had to upsize the pattern (it only went up to a 5), and I've run out of yarn! The body is done, but I've got next to nothing left for the sleeves (I can probably just manage some teeny-tiny capped sleeves, but Eleanor would prefer long sleeves, or at least short sleeves.) It's called Pettirosso by Moda Vera and is in lovely rusty shades. I got it at Spotlight last winter, and it's no longer available. If anyone has any to spare, I would be most grateful, from part of a ball up to 2 balls - name your price!

Wednesday 28 May 2014

Preparation

I'm working on a customer quilt, but it's taking a lot of preparation before the actual quilting can start. Quite apart from the usual design work and pressing, I had to plan the motifs, prepare them to trace, and then mark the quilt:


Now I'm basting it. This is where I long for a longarm. It's 86 x 110in, and an enormous basting task! I'm looking forward to the actual quilting though; I'm very happy with the semi-custom design we agreed on.

Friday 23 May 2014

BQF - Original Design

Pretty much all of my quilts could go in this category, but I've chosen to enter Nature's Gift:


Like my other entry, this quilt was a commissioned piece. It's close to 84in square; plenty big enough for a queen bed.


The silhouette trees took forever to  mark and cut, but they make the quilt.


I was given plenty of inspiration to work from, and from that narrowed the brief to Australian outback - but nothing too cliche. Hidden in the sky and on the ground are a selection of lesser known Australian native creatures; mostly birds plus a frog, platypus and eastern water dragon.


So we have the gorgeous outback ochres, with some green for contrast, and a small billabong, all beneath the massive blue sky.  The sky is pieced shoo-fly blocks, and the bottom is free-pieced curves.


I deliberately positioned some of the stars in the southern cross on lighter blue fabrics, so as not to make it too overt.


I put the platypus (above) by the water, and nearby there's a nod to bushfires (below).


I chose these echoed Cs for the ground quilting, filling horizontal segments separated by triple rows of wavy lines - it looks just as good from the back:


This water dragon was great fun to quilt, as a special request:


Thank you for visiting. The rest of the quilts in the Blogger's Quilt Festival original design category can be found here; please take the time to have a look, and nominate and vote for your favourites in all the categories.

BQF - Applique quilt

I've chosen to enter Hiding in the Sycamore in the applique category of the Blogger's Quilt Festival. I originally posted about it back here.


This is a quilt I made on commission, inspired by an earlier one I made which also featured a possum in a tree. Every time I post about one of these, I get all sorts of comments from North Americans about the cute possum. The opossum you have there is not a true possum, and is totally unrelated to the our Australian natives. Despite the fact that in many outer suburban areas (such as where we are, near a forested national park) the possums make a noise running on the roof at night and like to eat the flowers and fruits growing in the gardens, they're popular.


I build the possum applique buy doing the tail, then the branch, then the 2 legs, followed by the tummy, then the arms and shoulders, and the head. This series of photographs of my original possum shows how it comes together.

To achieve the furriness, they're stitched on using free-motion, moving in a random zigzag pattern. I use variegated threads, and go around each piece twice, using two different variegated threads, one slightly outside, slightly overlapping the other.  Different parts get different thread choices.


The eyes and nose are done with a pattern satin stitch, but the pink ears and paws are completely free-motion painted. Only the whiskers are hand sewn. The strawberry (like the remainder of the applique on the quilt) is done in a small buttonhole stitch, with matching threads. The applique is done prior to sandwiching, or the back would be very messy with the zigzags, but to maintain the soft edges, I free-motion quilt around the possum in a fine thread matching the background in a random zigzag.


The bluebirds were a special request from my customer. I was fortunate to find an odd floral in my stash, which included some red roses on the bright blue background, which worked perfectly to give the birds their red breasts. I 'hid' a third quilted bird above the appliqued pair, too.


Another personalised request was the quote which you can partially see in the photo above. It reads, "I see the moon and the moon sees me". Hence the appliqued moon! The words are quilted in a darker thread to help them stand out a little from the background quilting without being too dominant.


Finishing off the personal details are the sycamore leaves which are scattered around. I  roughly traced a few in position with an erasable fabric marker, and free-motion quilted them as I was doing the background. They just might be my favourite part of the quilt.


The rest of the background is filled with a simple swirl, which fits conveniently into the gaps between the branches.


Thanks to Amy for running the Blogger's Quilt Festival again. I encourage you to check out all the beautiful quilts in each category, and to nominate then vote for your favourites.

Wednesday 21 May 2014

James published

Yesterday we received a long-awaited parcel; James' Hidden Diamonds quilt back from Australian Patchwork & Quilting, along with a copy of Vol 23 No 10.


I'm so proud of him and all the work he put into this quilt.


He was involved in everything, from designing it in EQ7, painting all the fabric, most of the pinning, all the piecing, some of the pressing and helping with basting and quilting. But don't worry, if you want to make this quilt - I wrote up the instructions!


He's been very understanding that the quilt would be posted off as soon as it was finished and wouldn't be back for a few months, but was thrilled to have it back, especially now the days are getting cooler. His favourite part is the soft minky backing. The aqua wouldn't have been my instinctive choice, but it actually contrasts really nicely, and I'm glad I let him choose!


He hasn't had much time for quilting recently (and he needed a break after this effort) but he's already eyeing-off new fabrics!

Well done, James!

Sunday 18 May 2014

No bandwagons here

I whipped up this quilt top last night. It's about a metre square and uses about a dozen creamy-beige fabrics, with an emphasis on script and maps. But I'm not jumping on the low-volume bandwagon. In most cases they seem to me like a lot of effort for little impact. This is just the background. Those gorgeous autumnal batiks from yesterday will make a big difference.


Because it's the background for a lot of applique, I decided to press all my seams open, to keep it as smooth as possible. I usually press my seams to one side, and though it's not uncommon for me to press some seams open to spread the bulk, doing it for all of them did feel odd. The best part is, in the whole top, not a single seam allowance flipped the wrong way and needed unpicking!

Stored in drawers

Somewhere in the last couple of weeks I had a birthday, and I treated myself to a set of drawers I've been wanting for ages. They're Alex from IKEA and are wide and shallow - perfect for threads and my pattern sheets.


You can see the top four are filled with threads, although I will likely end up rearranging once I see how it works. I'm already thinking I might put some dividers in eventually. The bottom two drawers have patterns and so on; it's wonderful to have them stored neatly at last. I'm also thinking of getting a second unit and placing it directly on this one (minus the castors!).

Saturday 17 May 2014

Delicious

Quilting (and, in fact, productivity of any kind) has slowed to a crawl here recently. Six migraines (so far) within a fortnight tends to have that effect! Fortunately I have some pretty good medication which means migraines aren't the dreadful nightmare they could be - unless I don't get to them in time. But I am left wiped out, headachy and with swimmy vision for a few days, none of which are conducive to quilting, family life, work - or anything but getting sick of resting.


Anyway, it's been two full days and then some since the last one hit, and with fingers crossed, today I've been tinkering with applique preparation and this delicious pile of batiks - nothing which requires too much concentration just yet.

Saturday 10 May 2014

Fine filigree

This quilt has ended up with a variety of quilting. First there was all the ditching around the appliques, then the background swirls (which, in hindsight, probably should have been a small feather filler instead, but never mind), then the feathers, and finally the filigree in the heart.


This space was far too large to leave unquilted; it was terribly puffy. But I really didn't want to detract from the lovely symmetrical print, so I ended up following the pattern of the fabric. My little tip for spaces like this is to pin well, hold it as evenly as you can, and start by quilting through the centre. This, if you've done it properly, instantly divides the puffiness evenly into the two halves, and reduces the risk of pushing all the puff to one edge, causing distortion and puckers.

The white lines are little more than 1/16 of an inch wide, so it does end up making the quilting relatively dense just here, but that took care of the puffiness very effectively, and provides lovely texture. Being so fine a print, my quilting is not perfectly on the lines all the time, but the effect is still there, and sometimes completion trumps perfection.

Friday 9 May 2014

I felt like it

All the rest of the background on this quilt is filled with the swirly pattern I showed the other day. But a few nights ago, I felt like feathering this space. So I did.


Design-wise, it wasn't the most sensible choice; consistency would have been smart. But I quilt because I enjoy it, and what I decided I'd enjoy most was feathering, so that's what I did. And it works, well enough. This quilt is headed for a magazine to showcase the new fabrics, and will ultimately be a baby quilt. It's not destined to be shown - not by a long shot! So I'm convinced my choice was the right one, one way or another.

Tuesday 6 May 2014

Elephants Might Fly

...and one day I might be blogging regularly, but let's not hold our breath just yet!


This is my gorgeous new niece Emily under her quilt.


It matches the ones I made for my elephant-mad sister and my nephew (although I'm in the early design stages of a big train one for him now!).


The piecing of this quilt is fairly straightforward, but I love the richness of the blues and the geometric design - and of course it had to feature the Valori Wells elephants.


I had to quilt this one from the back, because the combination of the thicker batting (not that it's that thick) and flannel front and back mean that even with minimal seams meeting at corners, and even those pressed open, meant that the foot, even on a high setting (low pressure) really pulled over the seams. Fortunately I was quilting an allover pattern, with the same thread both sides, so I just flipped it over. It does mean the seams aren't quite as straight as I'd like, but Emily won't mind!

Down by the Bay

No, there are no watermelons in this quilt, but I came across the song which I remember singing as a child on YouTube a while back, and it was stuck in my head while making this quilt, so it seemed like a good name!


This commissioned quilt should by now have arrived, so I can finally share it; it was finished over a month ago.


My beach scene quilts start with several large sheets of paper taped together (above) and I draw out the perimeter, adding an extra inch or two to the desired finish size to allow for trimming, alterations and shrinkage. Then I divide it into the areas of the scene, then divide those into sections to be pieced. Those sections (below) are traced onto medium-weight interfacing, and I work on them from the bottom up, gradually adding fabrics one at a time.


I got a fun kite fabric a while back and have enjoyed adding a kite to the sky in a few recent beach scenes. I also got some colourful aeroplanes, and am looking forward to adding one of those to an upcoming quilt.


The small flock of tiny birds in the sky is a nice touch in this one, too; it links in with the sand pipers.


The shark fabric is also a new addition to my fabric collection; it took a while to find a suitable one - many shark prints are on unsuitable backgrounds, or too unrealistic.


This time I varied from the usual rainbow strip binding, and used a Michael Miller Paradise Cove stripe in blues, greens and aquas.


If you look closely in the image below, I added in a little detail in the quilting, completely unrelated to the quilt. The lady who commissioned it as a gift for her first grandchild is an entomologist...


Did you spot it? Here it is from the back...