Sunday 24 February 2013

Recrystallising

I made a start today on the second version of Crystallised. I chose a different thread palette:


And I tried something I've not done before...


...I threaded two threads through the needle, in the hopes it would stand out better. It's really easy to do on the 820 and worked perfectly.


This time I'm using a gorgeous batik backing which shows the quilting nicely.


This is the first, and largest-diameter, doily, with 1/3 - 1/2 of the quilting done.

I'm linking up with Leah's FMQ Friday.

Friday 22 February 2013

Crystallised

The quilt I made for my partner, Katherine, as part of DQS13 has arrived, and she has assured me she loves it. So here it is in full:


I learned several things while making this quilt, and am delighted with how it turned out.


The main thing was I realised the need for even heavier weight threads than I'd anticipated. I suspect that is largely due to the relative roughness of the linen I used as the base for the wholecloth quilt. This was my first time working with linen.


I also learned that while I'll never jump aboard the red and aqua bandwagon, there are ways to combine the two in ways I do like. This was aided by my choice of aquas on the green side of the scale (had I been able to obtain them, I would actually have preferred threads tending more towards apple green, but these still work) and deep reds with pink undertones. My partner expressed a like for the combination, but I could never bring myself to spend so many hours staring at colours I disliked, so I made it work.


I marked out sets of circles with evenly spaced segments as guidelines, then quilted everything free-hand. No fancy machine stitches were used; just a regular straight stitch, with the feed-dogs dropped and a free-motion foot and my hands to guide.


I didn't mark any of the actual quilting lines, just used the guidelines to keep my circles round and lace patterns even.


I used a variety of patterns - mostly scallops, loops and pearls in various forms and combinations. Some of the patterns are double-stitched to make them stand out better.


This quilt used quite a handful of threads in different weights, of numerous fibre types and from a selection of manufacturers - covered in this early progress post.


The stand-out thread was the sparkly white Razzle Dazzle which was couched in bobbin-work. I added it towards the end, once there was enough quilting already in place guided by the marked guidelines, that I could use the quilting as pseudo-guidelines to work from the back. Then I just kept adding more and more until each doily seemed complete. Many of the rows overlap or interlink with each other to increase the lace effect I was after.


Each doily-inspired circle is a different size, and all were quilted differently. I deliberately made a couple of the smaller ones in just aqua and white or red and white for variety. I carefully minimised my use of the red; being so much darker than the rest, it could easily have dominated the quilt, and I didn't want that.


And some exciting news, I'm about to commence work on a similar piece, using the same linen, as a project for Australian Patchwork & Quilting magazine's special machine quilting issue later this year!

Thursday 21 February 2013

Thank you!

I stumbled across a new-to-me quilting blog several weeks ago, called Spilling Energy. Zurn makes some lovely quilts, so I immediately added her to my blog reader.


By happy chance, she was giving away a batik jelly roll, cut from a selection of pastel batiks in her stash, and I decided to enter - and I won! This gorgeous roll arrived today, and I've already spent several hours playing with design options. I think I'm on the right track, but I still need to refine my pattern considerably before it's just right.

Thank you very much for such a great 'welcome' to your blog, Zurn!

(By the way, while my roll was in the post, she's already had another batik jelly-roll giveaway, so you might want to hang around her blog a while and enjoy her quilts - there may be more!)

Continuous swirls

Here's a little look at some of this week's quilting. I'm calling the design continuous swirls, because it works a bit like continuous curves, in that you can just move from one patch to the next through the corners.


I find these are much better if I freehand mark by hand first. I start my making a dot (just by eye, no measuring) in the centre of the patch, swoop into it from one corner, then swirl out to the opposite corner, then echo on either side.

There are also happen to be some continuous curves in the square patches. I actually mark these, too - again just freehand, but otherwise I tend to make them very wonky and off-centre.

Friday 15 February 2013

Quick feathers

Last week I did a quick allover feather on this cute little baby quilt for my best customer.


The gorgeous fabric quilted up beautifully and I did all the quilting in a single sitting - probably not ideal from an OHAS perspective (though I did pause to stretch a few times) but very satisfying!


It's quilted in a pale aqua Glide thread, with matching Bottomline on the back. I used my favourite, open meandering feather design, which I'm able to stitch out very smoothly and consistently with so much practice, and its flexibility makes it very forgiving on almost any quilt (not that there were any issues with this one - just saying...).

Linking up with Leah's FMQ Friday...

Set-in or Y-seams

I started work on a new quilt this week. Below is the palette (though I've since swapped the dark brown at the top for something with more light tones in it), with the likely binding and backing at the bottom:


The palette includes 3 Tula Pink prints, from 3 ranges; the dark teal at the top is from Neptune, the beige directly below it is Turtle Bay from Prince Charming, and the lighter teal towards the bottom is Ocean Ponies from Salt Water.


This one involves a lot of piecing, including a centre medallion with lots of Y-seams. I actually didn't have to piece the very centre this way, but it spreads the bulk far better, and the seam allowances swirl out into position (above) so handily!

(Second of the 3 seams pinned.
I marked the sewing lines at the corners with a Sewling pen to help align the pieces perfectly.)

I had avoided these for a long time, mostly due to their time-consuming nature, but they came together perfectly, and didn't take as long as I'd anticipated (or maybe it just seemed fast in relation to the oodles of piecing I'm doing for the pieced borders now...)

(Third seam sewn and pressed.
All the seams stop and backtrack at the 1/4in mark, rather than continuing to the edge of the fabric.)

I think in future I'll be doing more set-in seams instead of redesigning the blocks to avoid them - it's probably about even, time-wise (unless there are multiple blocks). While it's satisfying to be able to redraft a block to piece it my own way, sewing perfect set-in seams has its own satisfaction. Now I just need to figure out how to write simple, clear instructions for sewing them!

Sunday 10 February 2013

Pebbled Swoon

I've finally edited the photos of the third customer Swoon quilt I've quilted, ready to share. This one was pieced by Kayscha. I'm still working out the best set-up for photographing quilts on my foam boards in terms of positioning, keeping the boards vertical and straight, and lighting, but I'm really pleased with this new method. It probably takes longer to pin the quilts in place than it did to tape them up, but this way I can square them much better, whereas I was always distorting them out of square before!


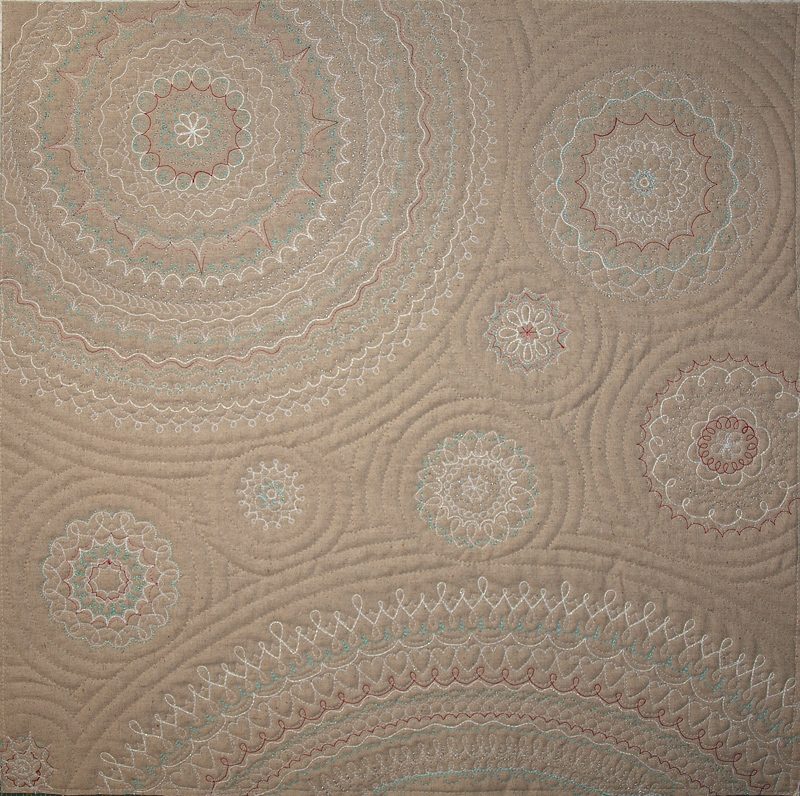
This one was only four, full-size Swoon blocks.


My quilting design incorporated lots of pebbling, both as a filler and in the form of pearls.


While I knew pebbling was time-consuming, I hadn't realised quite how long the strings of pearls would take. This was partly due to the need to repeatedly change the presser-foot pressure, to account for the the bulky seam allowances where multiple pieces converged.


However, I'm really pleased with the effect of the stringls of pearls. I chose to quilt them on a pale aqua thread, to help them stand out, and to match the highlights of aqua in each of the blocks.


I marked the all the curved lines surrounding the pearls using a single template. For the diamonds (below) I also marked the pearls, but free-hand.


I also marked the extra lines inside on some of the sections (below).


While the stippled background works well, it wasn't my first choice. I would have preferred to do more detailed work, but the pebbling had already taken well over the alotted time and I also felt that the detailed work would have been too dense, making the finished quilt too stiff (I know it is to go in a living room) so this was a better choice.


The centre of each block (above) was divided using curved lines into a diamond-in-a-square design, with the resultign spaces filled with pebbling. I also echoed the outer curved lines into the surrounding triangles, and effect I'm very happy with.


The feathers were all quilted free-hand, and it's all done in free-motion (it shows if you look closely at a  few of the curves - but I'm getting much smoother!).


All the quilting is done with Glide thread; an off-white for the background stippling, aqua for the pearls and pebbles, and a matching taupe for the feathers.

I'm linking up with Leah's FMQ Friday.

Saturday 9 February 2013

Contrast

A while back I showed some photos of the sunset fabric I over-painted, but couldn't show you the original. I was back at the same shop last week, and bought a little more, just so I could show the difference between the piece I bought and after I'd painted it:

Tuesday 5 February 2013

James' 4th quilt

It had been on the go for over six months, but just in time for Christmas James finished his latest quilt.


He loved the Spot fabric when we first saw it, and quickly asked if he could get some to make a quilt for his cousin Edward's teddies. It's abut 26in square.


James had some input into the design and choosing the additional fabrics. He did all the pinning and piecing (on my original Pfaff), but I cut the quilt and assisted with the pressing. Once I'd sandwiched it and started it off around the edges, he basted it with the curved safetly pins. We quilted it together (on the 820) with a stipple and I bound it.


He was thrilled to give it to Edward on Christmas Day.


Now he's keen to start on his fifth quilt. He's decided to paint his own fabric for it, and we've designed it together. Once I've worked out the requirements, we'll do the painting.

Crystallising

The lace is all quilted, and I'd hoped to be able to leave the background unquilted as a lovely contrast, but (unsurprisingly) this wasn't feasible. With such dense quilting in places, leaving large unquilted spaces would have made it lumpy, distorted and wavy.

(lace quilted, no background quilting, untrimmed)

So I decided to quilt circles around the doilies. I quilted them using the dual-feed and a full-width foot, using the width of the foot as my guide. The first circle around each doily I moved the needle a few notches to the right. This is because the doilies have 'bumpy' edges, and if I'd quilted the full width from the outermost points, it would have looked too wide. Once the first circles were done, I moved the needle back to the centre position, and this keeps the rings looking more even.

(showing the background fullness requiring quilting and my starting palette up the top)


The circles are quilted in matching Bottomline thread. This helps it to fade into the background, and the smooth lines don't demand attention and therefore don't detract from the feature quilting. I'm rather lucky I didn't space them further apart though - any less and there wouldn't have been enough of it to either see the faint pattern, or to keep the quilt flat. As it is, I'm delighted with how it worked.

(fully quilted and trimmed ready to bind)

The finished size needs to be a maximum of 20in square, and I cut mine a bit over this, then marked my likely final space within that, allowing for a fair bit of distortion and resulting trimming and expecting it to finish at about 18.5in square. But there was very little distortion, and of course I couldn't bring myself to trim away more of the quilting than necessary, so it's going to finish up at about 19.99in square!


I laid out the quilt with my potential binding fabric (by coincidence, the same one as I used for Bogong Bower only days ago - although I may not have thought of it had it not been used recently) and upon return, I'm confident it's right, though I did try a couple of subtle, pale aquas before I made my final decision. It's now fully bound, with a hanging sleeve attached and just needs proper photos and a label before I parcel it up.

Monday 4 February 2013

Laciness

I've finished free-motion quilting the doilies on my DQS13 quilt.


I ended up adding quite a bit more white to each one, to add to their laciness.


Unfortunately I'm finding it hard to photograph (or even edit) the colours accurately; the aqua threads are greener than they appear, and the reds are softer and more cranberry  than the look here - but I can't fix them without also sending the linen background to some dreadful, unnatural shade! And of course the sparkle in the heavy white, silver and one of the aquas doesn't show to full effect under flash.


Above is the one I deliberately left without cranberry. It's just a smidgen over 3in in diameter.


This one (above and below) occupies the largest space, and has I think 39 'rows', and quite a number of those rows were double or triple stitched to achieve the effect or pattern I wanted.


I'm not exactly sure, but the lace doilies have a total in the vicinity of 45,000 stitches. The quilt will finish at a fraction under 20in square once trimmed and bound.

Lace making

My lace quilting is progressing nicely.


Both the one above and the one below (the two biggest) I showed yesterday in the early stages; here they are filled in more, but still need extra quilting, especially white.


I just keep adding a bit more here and a bit more there until each doily is filled and balanced, working with one thread for a while, then swapping. I did a lot of thread changes - and that meant lots of bobbin changes, too.


I like to have several on the go at once, to reduce the thread chages a bit, and get a good balance, but the marks have been fading so quickly, I can't rely on them for more than about half an hour - so once I start, there's no interrupting me!


After finding the 30wt cotton white wasn't quite heavy enough, I ended up doing the rest of the white in Glide, going over most of the lines twice, and a few three times. Adding in the heavy, shimmery white Razzle Dazzle with bobbinwork also helped boost the whiteness. It really stands out (which means my little oopsie below is visible - but in the scheme of things not worth redoing).


I chose to quilt the one above with only cranberry and white (and silver), and I'll leave another of the smaller ones with just aqua, silver and white, for something different.